Cloud Resume Challenge (Azure) [Part 1 of 3]
Links
Introduction
First things first, just to clear the air and set expectations - I am not a developer or programmer. I'm learning, but my 10+ years in IT have been on the operations side. The language I'm most comfortable with is PowerShell. So, this may be a bumpy road at times.
In this multi-part series, I will be cataloging my journey through the (Azure) Cloud Resume Challenge. I guess I'm technically cheating by starting the blog at the beginning, because it's the last step, but I don't think anyone will mind. As I have also been working on CS50x (Harvard's Open Coursework 'Introduction to Computer Science' class) this year, this personal challenge is pulling double duty and will act as my final project as well.
What's the Cloud Resume Challenge? As codified by Forrest Brazeal, the Cloud Resume Challenge is "a hands-on project designed to help you bridge the gap from cloud certification to cloud job. It incorporates many of the skills that real cloud and DevOps engineers use in their daily work."
For this initial post, I will be walking through the first six steps (this is the easy part - the difficulty ratchets up from here), from inception to getting the site hosted as an Azure Storage static website with a custom domain name and full HTTPS support.
Step 1: Certification
The first requirement for the CRC is that the participant have obtained, at least, the AZ-900 Azure Fundamentals certification. This was the easiest part for me, as I already had the AZ-900 when I decided to start this.. which was actually a year ago, and my AZ-900 is now expired, but I do have the AZ-104 Azure Administrator certification - from just a few weeks ago, so that'll do nicely.
Step 2: HTML
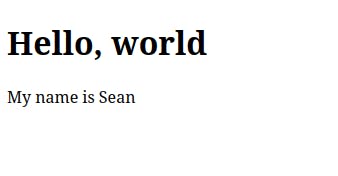
Static websites consist of HTML (with optional, but recommended, CSS and/or Javascript) - it's what the web is built on. Chances are, if you're around my age, you even played around with HTML back the late 90s or early 00s - back when GeoCities ruled the "personal website" space. Truth be told, aside from a small part of a single class in High School, that was the last time I touched HTML.. so I was a little rusty. But, much like riding a bike, I never forgot the basics. I won't go into all the HTML for my site here (it can be viewed in the DevTools Inspector if you visit my site), but a simple page would look something like this:
<!DOCTYPE html>

<html lang="en">
    <head>
        <title>
            <!-- This is what is displayed in the title bar/tab -->
            Hello, world
        </title>
    </head>
    <body>
        <!-- This is the actual "webpage" content -->
        <h1>Hello, world</h1>
        <p>My name is Sean</p>
    </body>
</html>
As I mentioned in the introduction, I've been working through CS50x and I just finished Week 8, which focused on HTML, CSS, and JavaScript. So it's all fresh in my mind and, with some inspiration from my print resume, I was able to get all the necessary content in the body of my page. Now, I just need to make it look nice...
Step 3: CSS
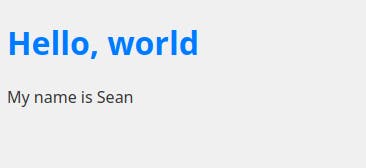
... which is a perfect segue to the next step - CSS, or Cascading Style Sheets. CSS is what makes your websites look pretty, and not just black text on a white background. For the uninitiated, it looks something like this:
body {
    font-family: Arial, sans-serif; /* This sets the font inside the <body> tags */
    background-color: #f0f0f0; /* This makes the background `Light Gray` */
    color: #333; /* This makes all body text `Charcoal` */
}

h1 {
    color: #007bff; /* This overwrites the above body color and makes <h1> text `Dodger Blue` */
}

p {
    font-size: 16px; /* This sets the font size in <p> tags to 16*/
}
For a practical demonstration, let's use the previous HTML. Here's a before and after:


Like I mentioned in the HTML section, you're welcome to use the DevTools Inspector to see the CSS for my page. It's nothing to brag about, but I did find some neat "Disorganized Paper Stack" CSS here that I used, since my idea was to make my page look like a printed version of my actual resume - it was kind of boring initially and needed some depth.
Step 4: Static Website
So this part was new to me - I'm not unfamiliar with Azure (obviously, I have the AZ-104), but I've never used the Static Website feature that's built into Azure Storage Accounts. We're getting a little more technical now, and I did the vast majority of this with Azure CLI, so we'll go over the commands I used and a brief description of what they do:
First, I needed a Storage Account, but before that, I needed a Resource Group. Azure's "North Central US" region is closest to me, so I chose that as the location, and I chose Standard_LRS as the redundancy type.
az group create --name sy4azureresume --location northcentralus

az storage account create --name sy4azureresume --resource-group sy4azureresume --location northcentralus --sku Standard_LRS
Next, I needed to enable the Static Website hosting option on the storage account. This, among other things, creates a '$web' folder inside the storage account, which we'll use in just a minute.
az storage blob service-properties update --account-name sy4azureresume --static-website --404-document 404.html --index-document index.html
As mentioned, after the static webpage hosting is initialized, we need to upload our website files - 'index.html' and 'styles.css' in my case, located inside the 'azure_cloud_resume' directory on my computer.
az storage blob upload-batch -s ~/source_control/azure_cloud_resume/website -d '$web' --account-name sy4azureresume
Lastly, we need to get the default web endpoint for the storage account, so we can check if the site is being presented - I didn't take any screenshots to prove it, but it worked.
az storage account show -n sy4azureresume -g sy4azureresume --query "primaryEndpoints.web" --output tsv
Step 5: HTTPS
The way to utilize HTTPS for an Azure Storage static website is to use an Azure CDN endpoint. This was completely new to me, and I wasn't comfortable using the CLI for something I wasn't familiar with, so I used the Azure Portal. I could post screenshots of the process, but I just used the Microsoft documentation here and here (both of which include screenshots) to complete this step. It took about an hour for the 'Custom HTTPS' setting to fully enable on my CDN endpoint, but YMMV (your mileage may vary).
Step 6: DNS
This step is performed in conjunction with the previous as part of setting up the CDN endpoint and enabling HTTPS, so it's included in the documentation I previously linked. The only thing that may be worth mentioning is I use Cloudflare as my DNS provider, and did not utilize Azure DNS. After finishing steps 5 and 6, my website is successfully accessible by browsing to https://resume.seanyoung.me! 🎉
Conclusion
And that's where it currently stands as of March 20, 2024. In the next part, whenever I make some more progress, I'll probably try to tackle steps 7 (JavaScript) - 11 (Python Tests). Then, in part 3, we'll tie everything together and get into the really cool stuff with steps 12 (IaC) - 15 (CI/CD with GitHub Actions).
